Difference between revisions of "Orange Pi R1 Plus LTS(With Metal Case)"
(→Prepare the necessary accessories) |
|||
| (37 intermediate revisions by the same user not shown) | |||
| Line 6: | Line 6: | ||
Orange Pi R1 Plus LTS is an open source single-board computer, a new generation of arm-64 development board, it can run Android 9.0, Ubuntu, Debian and OpenWRT and other operating systems. Orange Pi R1 Plus LTS uses Rockchip rk3328 system-on-chip and has 1GB LPDDR3 memory<br> | Orange Pi R1 Plus LTS is an open source single-board computer, a new generation of arm-64 development board, it can run Android 9.0, Ubuntu, Debian and OpenWRT and other operating systems. Orange Pi R1 Plus LTS uses Rockchip rk3328 system-on-chip and has 1GB LPDDR3 memory<br> | ||
<br> | <br> | ||
| + | |||
=== '''Purpose of Orange Pi R1 Plus LTS?''' === | === '''Purpose of Orange Pi R1 Plus LTS?''' === | ||
<br> | <br> | ||
| Line 57: | Line 58: | ||
|- | |- | ||
| Debug serial port|| UART-TX、UART-RX and GND | | Debug serial port|| UART-TX、UART-RX and GND | ||
| − | |||
| − | |||
|- | |- | ||
| Button|| 1x Reset Button | | Button|| 1x Reset Button | ||
| Line 72: | Line 71: | ||
|colspan=2|<div style="text-align:center;font-weight:700;">'''Appearance specification introduction'''</div> | |colspan=2|<div style="text-align:center;font-weight:700;">'''Appearance specification introduction'''</div> | ||
|- | |- | ||
| − | | Dimension|| | + | | Dimension|| 63mmX60.6mmX27.3mm |
|- | |- | ||
| − | | Weight|| | + | | Weight|| 175g |
|- | |- | ||
| − | |colspan=2|<div style="text-align:center;">[[ | + | |colspan=2|<div style="text-align:center;">[[File:Orange-pi-small-logo.png|30px|]]Orange Pi™ is a trademark of the Shenzhen Xunlong Software CO., Limited</div> |
|} | |} | ||
<br> | <br> | ||
| + | |||
=== '''Top view and Bottom view of Orange Pi R1 Plus LTS''' === | === '''Top view and Bottom view of Orange Pi R1 Plus LTS''' === | ||
<br> | <br> | ||
'''Top View:'''<br> | '''Top View:'''<br> | ||
| − | <div>[[ | + | <div>[[File:Orange-pi-r1-plus-lts-img1.png|500px|]]</div> |
<br> | <br> | ||
'''Bottom View:'''<br> | '''Bottom View:'''<br> | ||
| − | <div>[[ | + | <div>[[File:Orange-pi-r1-plus-lts-img2.png|500px|]]</div> |
<br> | <br> | ||
=== '''Orange Pi R1 Plus LTS interface details''' === | === '''Orange Pi R1 Plus LTS interface details''' === | ||
<br> | <br> | ||
| − | <div>[[ | + | <div>[[File:Orange-pi-r1-plus-lts-img3.png|600px|]]</div> |
<br> | <br> | ||
| − | <div>[[ | + | <div>[[File:Orange-pi-r1-plus-lts-img4.png|600px|]]</div> |
<br> | <br> | ||
== '''Introduction to use the development board''' == | == '''Introduction to use the development board''' == | ||
| Line 98: | Line 98: | ||
<br> | <br> | ||
1)TF card, a high-speed card of class 10 or higher with a minimum capacity of 8GB, it is recommended to use SanDisk TF card. Orange Pi tests are all SanDisk TF cards. Other brands of TF cards may cause the system to fail to start.<br> | 1)TF card, a high-speed card of class 10 or higher with a minimum capacity of 8GB, it is recommended to use SanDisk TF card. Orange Pi tests are all SanDisk TF cards. Other brands of TF cards may cause the system to fail to start.<br> | ||
| − | <div | + | <div>[[File:Orange-pi-one-img4.png|250px]]</div> |
<br> | <br> | ||
2)TF card reader, used to read and write TF card<br> | 2)TF card reader, used to read and write TF card<br> | ||
| − | <div | + | <div>[[File:Orange-pi-3-lts-tfcard.png|250px]]</div> |
<br> | <br> | ||
3)Power adapter, 5V/2A or 5V/3A high-quality Type C interface power adapter<br> | 3)Power adapter, 5V/2A or 5V/3A high-quality Type C interface power adapter<br> | ||
| − | <div | + | <div>[[File:Orange-pi-r1-plus-lts-img5.png|250px]]</div> |
<br> | <br> | ||
4)13pin interface board<br> | 4)13pin interface board<br> | ||
a.The actual interface board is shown below | a.The actual interface board is shown below | ||
<br> | <br> | ||
| − | <div | + | <div> |
| − | [[ | + | [[File:Orange-pi-r1-plus-lts-img6.png|250px]] |
</div> | </div> | ||
<br> | <br> | ||
b.The way to insert the interface board into the development board is as follows, remember not to insert it backwards | b.The way to insert the interface board into the development board is as follows, remember not to insert it backwards | ||
<br> | <br> | ||
| − | <div | + | <div> |
| − | [[ | + | [[File:Orange-pi-r1-plus-lts-img7.png|250px]] |
</div> | </div> | ||
<br> | <br> | ||
| Line 132: | Line 132: | ||
d.The schematic diagram of the 13pin header of Orange Pi R1 Plus LTS is shown below | d.The schematic diagram of the 13pin header of Orange Pi R1 Plus LTS is shown below | ||
<div> | <div> | ||
| − | [[ | + | [[File:Orange-pi-r1-plus-lts-img8.png|600px]] |
</div> | </div> | ||
<br> | <br> | ||
| − | 5)CPU fan, used to dissipate heat to the CPU, the interface voltage is 5V, the interface specification is 2pin, 1.5mm spacing | + | 5)'''CPU fan, used to dissipate heat to the CPU, the interface voltage is 5V, the interface specification is 2pin, 1.5mm spacing''' |
| − | <div | + | <div> |
| − | [[ | + | [[File:Orange-pi-r1-plus-lts-img9.png|400px]] |
</div> | </div> | ||
<br> | <br> | ||
6)IR remote control, mainly used to control Android system<br> | 6)IR remote control, mainly used to control Android system<br> | ||
<br> | <br> | ||
| − | <div | + | <div> |
| − | [[ | + | [[File:Orange-pi-pc-plus-img4.png|250px]] |
</div> | </div> | ||
<br> | <br> | ||
| Line 150: | Line 150: | ||
8)AV video cable, used to connect the development board to the TV through the CVBS interface to display video (only available for Android System)<br> | 8)AV video cable, used to connect the development board to the TV through the CVBS interface to display video (only available for Android System)<br> | ||
<br> | <br> | ||
| − | <div | + | <div > |
| − | [[ | + | [[File:Orange-pi-pc-plus-img5.png|250px]] |
</div> | </div> | ||
<br> | <br> | ||
9)USB to TTL module and DuPont cable, when using the serial port debugging function, you need USB to TTL module and DuPont cable to connect the development board and the computer<br> | 9)USB to TTL module and DuPont cable, when using the serial port debugging function, you need USB to TTL module and DuPont cable to connect the development board and the computer<br> | ||
<br> | <br> | ||
| − | <div | + | <div > |
| − | [[ | + | [[File:Orange-pi-r1-plus-lts-img10.png|165px]][[File:Orange-pi-lite-img10.png|450px]] |
</div> | </div> | ||
<br> | <br> | ||
| Line 172: | Line 172: | ||
<br> | <br> | ||
1)The download URL of the Chinese version is:<br> | 1)The download URL of the Chinese version is:<br> | ||
| − | http://www.orangepi.cn/ | + | http://www.orangepi.cn/html/hardWare/computerAndMicrocontrollers/service-and-support/Orange-Pi-R1-Plus-LTS-Router.html |
| − | + | <br> | |
2)The download URL of the English version is:<br> | 2)The download URL of the English version is:<br> | ||
| − | http://www.orangepi.org/ | + | http://www.orangepi.org/html/hardWare/computerAndMicrocontrollers/service-and-support/Orange-Pi-R1-Plus-LTS-With-Metal-Case.html |
| − | + | <br> | |
3)The information mainly contains<br> | 3)The information mainly contains<br> | ||
| − | <div | + | <div > |
a.Android source code: saved on Baidu Cloud Disk and Google Cloud Disk<br> | a.Android source code: saved on Baidu Cloud Disk and Google Cloud Disk<br> | ||
b.Linux source code: saved on github, the link address is<br> | b.Linux source code: saved on github, the link address is<br> | ||
| − | https://github.com/orangepi-xunlong | + | https://github.com/orangepi-xunlong/orangepi-build |
| − | c. User | + | c.OpenWRT source code: saved on github, the link address is<br> |
| − | + | https://github.com/orangepi-xunlong/openwrt | |
| − | + | d. User manual and schematic diagram: chip related data manual will also be placed here<br> | |
| − | + | e. Official tools: mainly include the software needed in the use of the development board<br> | |
| − | + | f. Android image: saved on Baidu Cloud Disk and Google Cloud Disk<br> | |
| − | + | g. Ubuntu image: saved on Baidu Cloud Disk and Google Cloud Disk<br> | |
| + | h. Debian image: saved on Baidu Cloud Disk and Google Cloud Disk<br> | ||
| + | i. OpenWRT image: saved on Baidu Cloud Disk and Google Cloud Disk | ||
</div> | </div> | ||
<br> | <br> | ||
| − | + | ||
| − | + | === '''Method to burn Linux image or OpenWRT image to TF card based on Windows PC''' === | |
| − | |||
<br> | <br> | ||
| − | + | 1)The method of burning OpenWRT image based on Windows PC is the same as the method of burning Linux image. The following is an example of burning Linux image<br> | |
<br> | <br> | ||
| − | + | 2)First, prepare a TF card with 8GB or larger capacity. The transmission speed of the TF card must be above class10. It is recommended to use a TF card of SanDisk and other brands<br> | |
<br> | <br> | ||
| − | + | 3)Then use the card reader to insert the TF card into the windows computer<br> | |
<br> | <br> | ||
| − | + | 4)Then format the TF card<br> | |
<div style="padding-left:20px;"> | <div style="padding-left:20px;"> | ||
a.You can use the SD Card Formatter software to format the TF card, the download address is<br> | a.You can use the SD Card Formatter software to format the TF card, the download address is<br> | ||
| Line 208: | Line 209: | ||
<br> | <br> | ||
c.If the computer only has a TF card inserted, the TF card's drive letter will be displayed in the Select card column. If the computer has multiple USB storage devices inserted, you can select the drive letter corresponding to the TF card through the drop-down box<br> | c.If the computer only has a TF card inserted, the TF card's drive letter will be displayed in the Select card column. If the computer has multiple USB storage devices inserted, you can select the drive letter corresponding to the TF card through the drop-down box<br> | ||
| − | <div | + | <div>[[File:Orange-pi-3lts-sdcardformatter.png|400px]]</div> |
d.Then click Format, a warning box will pop up before formatting, and formatting will start after selecting "Yes (Y)" | d.Then click Format, a warning box will pop up before formatting, and formatting will start after selecting "Yes (Y)" | ||
| − | <div | + | <div>[[File:Orange-pi-3lts-sdcardformatter1.png|400px]]</div> |
e.After formatting the TF card, the message shown in the figure below will pop up, click OK<br> | e.After formatting the TF card, the message shown in the figure below will pop up, click OK<br> | ||
| − | <div | + | <div>[[File:Orange-pi-3lts-sdcardformatter2.png|400px]]</div> |
</div> | </div> | ||
| − | + | 5)Download the Linux operating system image file compression package you want to burn from the Orange Pi data download page, and then use the decompression software to decompress it. In the decompressed file, the file ending with ".img" is the operating system image file,the size is generally above 1GB.<br> | |
<br> | <br> | ||
| − | + | 6)Use Win32Diskimager to burn Linux image to TF card<br> | |
<div style="padding-left:20px;"> | <div style="padding-left:20px;"> | ||
a.The download page of Win32Diskimager is<br> | a.The download page of Win32Diskimager is<br> | ||
| Line 223: | Line 224: | ||
<p style="padding-left:20px;"> | <p style="padding-left:20px;"> | ||
a)First select the path of the image file<br> | a)First select the path of the image file<br> | ||
| − | b)Then confirm that the drive letter of the TF card is the same as that displayed in the | + | b)Then confirm that the drive letter of the TF card is the same as that displayed in the "Device" column<br> |
| − | c)Finally click | + | c)Finally click "Write" to start burning |
</p> | </p> | ||
| − | <div | + | <div>[[File:Orange-pi-3lts-selectimage.png|400px]]</div> |
c.After the image writing is completed, click the "Exit" button to exit, and then you can pull out the TF card and insert it into the development board to start | c.After the image writing is completed, click the "Exit" button to exit, and then you can pull out the TF card and insert it into the development board to start | ||
</div> | </div> | ||
| − | === '''Method of flashing Linux image to TF card based on Ubuntu PC''' === | + | === '''Method of flashing Linux image or OpenWRT image to TF card based on Ubuntu PC''' === |
<br> | <br> | ||
| − | 1) | + | 1)The method of flashing OpenWRT image based on Ubuntu PC is the same as that of flashing Linux image. The following is an example of flashing Linux image<br> |
<br> | <br> | ||
| − | 2)Then use a card reader to insert the TF card into the computer<br> | + | 2)First, prepare a TF card with 8GB or larger capacity. The transmission speed of the TF card must be above class10. It is recommended to use a TF card of SanDisk and other brands<br> |
| + | <br> | ||
| + | 3)Then use a card reader to insert the TF card into the computer<br> | ||
<br> | <br> | ||
| − | + | 4)Download balenaEtcher software, the download address is<br> | |
https://www.balena.io/etcher/ | https://www.balena.io/etcher/ | ||
| − | + | 5)After entering the balenaEtcher download page, please select the Linux version of the software through the drop-down box to download<br> | |
<br> | <br> | ||
| − | <div | + | <div>[[File:Orange-pi-3lts-selectlinuxversion.png|600px]]</div> |
<br> | <br> | ||
| − | + | 6)After downloading, use unzip to decompress. The decompressed balenaEtcher-1.5.109-x64.AppImage is the software needed to burn Linux image | |
<div style="background:#f1f1f1;border: 1px solid #000;"> | <div style="background:#f1f1f1;border: 1px solid #000;"> | ||
| − | test@test:~$ unzip balena-etcher-electron-1.5.109-linux-x64.zip <br> | + | test@test:~$ '''unzip balena-etcher-electron-1.5.109-linux-x64.zip'''<br> |
Archive: balena-etcher-electron-1.5.109-linux-x64.zip<br> | Archive: balena-etcher-electron-1.5.109-linux-x64.zip<br> | ||
| − | inflating: balenaEtcher-1.5.109-x64.AppImage<br> | + | inflating: balenaEtcher-1.5.109-x64.AppImage<br> |
| − | test@test:~$ ls<br> | + | test@test:~$ '''ls'''<br> |
| − | balenaEtcher-1.5.109-x64.AppImage balena-etcher-electron-1.5.109-linux-x64.zip | + | '''balenaEtcher-1.5.109-x64.AppImage''' balena-etcher-electron-1.5.109-linux-x64.zip |
</div> | </div> | ||
<br> | <br> | ||
| − | + | 7)Download the Linux operating system image file compression package you want to burn from Orange Pi's data download page, and then use the decompression software to decompress it. In the decompressed file, the file ending with ".img" is the operating system image file. The size is generally above 1GB<br> | |
| − | + | a.The decompression command of the compressed package at the end of 7z is as follows | |
<div style="background:#f1f1f1;border: 1px solid #000;"> | <div style="background:#f1f1f1;border: 1px solid #000;"> | ||
| − | test@test:~$ 7z x | + | test@test:~$ '''7z x Orangepir1plus-lts_2.1.4_ubuntu_bionic_server_linux<br> |
| + | 5.10.44.7z'''<br> | ||
| + | test@test:~$ '''ls Orangepir1plus-lts_2.1.4_ubuntu_bionic_server_linux<br> | ||
| + | 5.10.44.*'''<br> | ||
| + | Orangepir1plus-lts_2.1.4_ubuntu_bionic_server_linux<br> | ||
| + | 5.10.44.7z <br> | ||
| + | Orangepir1plus-lts_2.1.4_ubuntu_bionic_server_linux<br> | ||
| + | 5.10.44.img.sha #Checksum file<br> | ||
| + | '''Orangepir1plus-lts_2.1.4_ubuntu_bionic_server_linux<br> | ||
| + | 5.10.44.img''' # image file | ||
</div> | </div> | ||
| − | + | <br> | |
| + | 8)After decompressing the image, you can first use the sha256sum -c *.sha command to calculate whether the checksum is correct. If it is prompted that the downloaded image is correct, you can safely burn it to the TF card. If the checksum does not match, it indicates There is a problem with the downloaded image, please try to download again<br> | ||
<div style="background:#f1f1f1;border: 1px solid #000;"> | <div style="background:#f1f1f1;border: 1px solid #000;"> | ||
| − | test@test:~$ | + | test@test:~$ '''sha256sum -c *.sha'''<br> |
| + | Orangepir1plus-lts_2.1.4_ubuntu_bionic_server_linux<br> | ||
| + | 5.10.44.img: Success | ||
</div> | </div> | ||
| − | + | 9)Then double-click balenaEtcher-1.5.109-x64.AppImage on the graphical interface of Ubuntu PC to open balenaEtcher (no installation required), the opened interface is shown in the figure below<br> | |
| − | |||
<div style="padding-left:20px;"> | <div style="padding-left:20px;"> | ||
| − | a.First select the path of the image file<br> | + | a. First select the path of the linux image file<br> |
| − | b.Then select the device number of the TF card<br> | + | b. Then select the device number of the TF card<br> |
| − | c.Finally click Flash to start burning | + | c. Finally click Flash to start burning |
</div> | </div> | ||
| − | <div | + | <div>[[File:Orange-pi-3lts-balenaetcher.png|600px]]</div> |
| − | + | 10)The writing speed and remaining time will be prompted during the burning process | |
| − | <div | + | <div>[[File:Orange-pi-3lts-balenaetcher1.png|600px]]</div> |
| − | + | 11)After burning, the following interface will be displayed. At this time, you can unplug the TF card from the computer and insert it into the development board to start. | |
| − | <div | + | <div >[[File:Orange-pi-3lts-balenaetcher2.png|600px]]</div> |
=== '''Method of flashing Android firmware to TF card''' === | === '''Method of flashing Android firmware to TF card''' === | ||
<br> | <br> | ||
| − | <span style="color:red;font-weight:700;"> | + | <span style="color:red;font-weight:700;"> Android image can only be burned to TF card using SDDiskTool software under Windows platform, and cannot be burned under Linux platform</span><br> |
<br> | <br> | ||
| − | 1)First prepare a TF card with | + | 1)First prepare a TF card with 8GB or larger capacity. The transmission speed of the TF card must be above class10. It is recommended to use a TF card of SanDisk and other brands<br> |
<br> | <br> | ||
2)Then use a card reader to insert the TF card into the computer<br> | 2)Then use a card reader to insert the TF card into the computer<br> | ||
<br> | <br> | ||
| − | 3)Download | + | 3)Download Android 9.0 firmware and SDDiskTool burning tool from Orange Pi's data download page<br> |
<br> | <br> | ||
| − | 4)Use the decompression software to decompress the downloaded Android firmware compressed package. In the decompressed file, the file ending with ".img" is the Android firmware<br> | + | 4) Use the decompression software to decompress the downloaded Android firmware compressed package. In the decompressed file, the file ending with ".img" is the Android firmware<br> |
<br> | <br> | ||
| − | 5)Use | + | 5) Use decompression software to decompress SDDiskTool_v1.59, this software does not need to be installed, find SD_Firmware_Tool in the decompressed folder and open it |
| − | <div | + | <div >[[File:Orange-pi-r1-plus-lts-img12.png|600px]]</div> |
<br> | <br> | ||
| − | 6)After opening | + | 6)After opening SD_Firmware_Tool, if the TF card is recognized normally, the name and capacity of the TF card will be displayed when the removable disk device is selected. <span style="color:red;">Please make sure that the displayed TF card device information is consistent with the device information of the TF card you want to burn.</span> There is no display, you can try to unplug the TF card<br> |
| − | <div | + | <div >[[File:Orange-pi-r1-plus-lts-img13.png|600px]]</div> |
| − | 7)After confirming the | + | 7)After confirming the device information, start writing the Android firmware to the TF card<br> |
| − | |||
| − | |||
<div style="padding-left:20px;"> | <div style="padding-left:20px;"> | ||
| − | a.First | + | a. First check "SD start" in the "Select function mode" column<br> |
| − | b.Select | + | b. Select the path of Android image in "Select Firmware Upgrade"<br> |
| − | c.Then click the | + | c. Then click the "Start Create" button<br> |
| + | <div >[[File:Orange-pi-r1-plus-lts-img14.png|600px]]</div> | ||
| + | <br> | ||
| + | d.After clicking "Start to create", a warning box will pop up, select "Yes (Y)" to start burning | ||
| + | <div >[[File:Orange-pi-r1-plus-lts-img15.png|600px]]</div> | ||
| + | <br> | ||
| + | e.After starting to burn, the partition currently being burned will be displayed below | ||
| + | <div >[[File:Orange-pi-r1-plus-lts-img16.png|600px]]</div> | ||
| + | <br> | ||
</div> | </div> | ||
| − | + | 8)After burning, the display of SD_Firmware_Tool is as shown in the figure below. At this time, click the OK button to close SD_Firmware_Tool, and then you can unplug the TF card from the computer and insert it into the development board to start<br> | |
| − | + | <div >[[File:Orange-pi-r1-plus-lts-img17.png|600px]]</div> | |
| − | <div | + | |
| − | |||
=== ''' Start the Orange Pi development board''' === | === ''' Start the Orange Pi development board''' === | ||
<br> | <br> | ||
1)Insert the burned TF card into the TF card slot of the Orange Pi development board<br> | 1)Insert the burned TF card into the TF card slot of the Orange Pi development board<br> | ||
| − | 2 | + | 2) The development board has an Ethernet port, which can be plugged into a network cable for Internet access<br> |
| − | + | 3)Connect a 5V/2A (5V/3A is also available) high-quality power adapter<br> | |
| − | + | <div style="padding-left:20px;color:red;font-weight:700;"> | |
| − | + | a.Remember not to plug in the 12V power adapter, if you plug in the 12V power adapter, it will burn the development board<br> | |
| − | <div style="padding-left:20px;> | ||
| − | a.Remember not to plug in the 12V power adapter, if the 12V power adapter | ||
b.Many unstable phenomena during system power-on and startup are basically caused by power supply problems, so a reliable power adapter is very important | b.Many unstable phenomena during system power-on and startup are basically caused by power supply problems, so a reliable power adapter is very important | ||
</div> | </div> | ||
| − | + | 4)If you want to view the output information of the system through the debug serial port, please use the USB to TTL module and DuPont cable to connect the development board to the computer. For the connection method of the serial port, please refer to the section on the use of the debug serial port<br> | |
| − | + | 5)Then turn on the switch of the power adapter, if everything is normal, the serial terminal can see the output log of the system startup at this time<br> | |
| + | <br> | ||
=== '''How to use the debug serial port''' === | === '''How to use the debug serial port''' === | ||
==== '''Debug serial port connection instructions''' ==== | ==== '''Debug serial port connection instructions''' ==== | ||
| − | 1)First, you need to prepare a USB to TTL module. This module can be bought in Orange Pi | + | 1)First, you need to prepare a USB to TTL module. This module can be bought in Orange Pi Store. If there are other similar USB to TTL modules, you can also insert the USB port of the USB to TTL module into the USB of the computer Interface |
| − | <div | + | <div >[[File:Orange-pi-one-img9.png|600px]]</div> |
| − | 2)The corresponding relationship between the debug serial port GND, | + | 2)The corresponding relationship between the debug serial port GND, TX and RX pins of the development board is shown in the figure below |
| − | <div | + | <div >[[File:Orange-pi-r1-plus-lts-img18.png|600px]]</div> |
| − | 3)The GND, | + | 3)The GND, TX and RX pins of the USB to TTL module need to be connected to the debug serial port of the development board through a Dupont cable<br> |
<div style="padding-left:20px"> | <div style="padding-left:20px"> | ||
a. Connect the GND of the USB to TTL module to the GND of the development board<br> | a. Connect the GND of the USB to TTL module to the GND of the development board<br> | ||
| − | b. Connect the | + | b. Connect the RX of the USB to TTL module to the TX of the development board<br> |
| − | c. Connect the | + | c. Connect the TX of the USB to TTL module to the RX of the development board |
</div> | </div> | ||
<br> | <br> | ||
4)The schematic diagram of connecting the USB to TTL module to the computer and the Orange Pi development board is shown below | 4)The schematic diagram of connecting the USB to TTL module to the computer and the Orange Pi development board is shown below | ||
| − | <div | + | <div >[[File:Orange-pi-3lts-ttlmodule2.png|600px]]</div> |
| + | <br> | ||
| + | 5)If you are using a CP2102 USB to TTL module, under the condition of a baud rate of 1.500000, some systems may encounter garbled or unusable problems. The specific test situation is as follows | ||
| + | {| class="wikitable" style="width:800px;" | ||
| + | |- | ||
| + | | USB to TTL module model|| Host system|| Support situation | ||
| + | |- | ||
| + | | rowspan=5|CH340|| win7 || ok | ||
| + | |- | ||
| + | | win10|| ok | ||
| + | |- | ||
| + | | ubuntu14.04|| ok | ||
| + | |- | ||
| + | | ubuntu18.04|| ok | ||
| + | |- | ||
| + | | ubuntu20.04|| ok | ||
| + | |- | ||
| + | | rowspan=5|CP2102|| win7 || ok | ||
| + | |- | ||
| + | | win10|| Not available | ||
| + | |- | ||
| + | | ubuntu14.04|| ok | ||
| + | |- | ||
| + | | ubuntu18.04|| Not available | ||
| + | |- | ||
| + | | ubuntu20.04|| Not available | ||
| + | |} | ||
| + | <br> | ||
==== '''How to use the debugging serial port on Ubuntu platform''' ==== | ==== '''How to use the debugging serial port on Ubuntu platform''' ==== | ||
| Line 354: | Line 399: | ||
<br> | <br> | ||
5)After executing the putty command, the following interface will pop up | 5)After executing the putty command, the following interface will pop up | ||
| − | <div | + | <div >[[File:Orange-pi-3lts-putty.png|600px]]</div> |
<br> | <br> | ||
6)First select the setting interface of the serial port | 6)First select the setting interface of the serial port | ||
| − | <div | + | <div >[[File:Orange-pi-3lts-putty1.png|600px]]</div> |
7)Then set the parameters of the serial port<br> | 7)Then set the parameters of the serial port<br> | ||
| − | <div | + | <div> |
a. Set the Serial line to connect to to /dev/ttyUSB0 (modify to the corresponding node name, generally /dev/ttyUSB0)<br> | a. Set the Serial line to connect to to /dev/ttyUSB0 (modify to the corresponding node name, generally /dev/ttyUSB0)<br> | ||
| − | b. Set Speed (baud) to | + | b. Set Speed (baud) to 1500000 (baud rate of the serial port)<br> |
c. Set Flow control to None | c. Set Flow control to None | ||
</div> | </div> | ||
| − | <div | + | <div >[[File:Orange-pi-r1-plus-lts-img19.png|600px]]</div> |
8)After setting the serial port setting interface, return to the Session interface | 8)After setting the serial port setting interface, return to the Session interface | ||
<div style="padding-left:20px;"> | <div style="padding-left:20px;"> | ||
a. First select the Connection type as Serial<br> | a. First select the Connection type as Serial<br> | ||
b. Then click the Open button to connect to the serial port</div> | b. Then click the Open button to connect to the serial port</div> | ||
| − | <div | + | <div >[[File:Orange-pi-r1-plus-lts-img21.png|600px]]</div> |
<br> | <br> | ||
9)After starting the development board, you can see the Log information output by the system from the opened serial port terminal | 9)After starting the development board, you can see the Log information output by the system from the opened serial port terminal | ||
| − | <div | + | <div >[[File:Orange-pi-3lts-putty4.png|600px]]</div> |
==== '''How to use the debugging serial port on Windows platform''' ==== | ==== '''How to use the debugging serial port on Windows platform''' ==== | ||
| Line 386: | Line 431: | ||
b.After entering the MobaXterm download page, click '''GET XOBATERM NOW!''' | b.After entering the MobaXterm download page, click '''GET XOBATERM NOW!''' | ||
</div> | </div> | ||
| − | <div | + | <div>[[File:Orange-pi-3lts-mobaxterm.png|600px]]</div> |
<br> | <br> | ||
<div style="padding-left:20px;"> | <div style="padding-left:20px;"> | ||
c.Then choose to download the Home version | c.Then choose to download the Home version | ||
</div> | </div> | ||
| − | <div | + | <div >[[File:Orange-pi-3lts-homeversion.png|600px]]</div> |
<div style="padding-left:20px;"> | <div style="padding-left:20px;"> | ||
d.Then select the Portable version, after downloading, you don’t need to install it, just open it and you can use it | d.Then select the Portable version, after downloading, you don’t need to install it, just open it and you can use it | ||
</div> | </div> | ||
| − | <div | + | <div >[[File:Orange-pi-3lts-mobaxterm1.png|600px]]</div> |
3)After downloading, use the decompression software to decompress the downloaded compressed package, you can get the executable software of MobaXterm, and then double-click to open it | 3)After downloading, use the decompression software to decompress the downloaded compressed package, you can get the executable software of MobaXterm, and then double-click to open it | ||
| − | <div | + | <div >[[File:Orange-pi-3lts-mobaxterm2.png|600px]]</div> |
4)After opening the software, the steps to set up the serial port connection are as follows<br> | 4)After opening the software, the steps to set up the serial port connection are as follows<br> | ||
<div style="padding-left:20px;"> | <div style="padding-left:20px;"> | ||
| − | a. Open the session | + | a. Open setting interface of the session<br> |
b. Select the serial port type<br> | b. Select the serial port type<br> | ||
| − | c. Select the port number of the serial port (choose the corresponding port number according to the actual situation), if you can't see the port number, please use the | + | c. Select the port number of the serial port (choose the corresponding port number according to the actual situation), if you can't see the port number, please use the "360 driver master" to scan and install the USB to TTL serial chip driver<br> |
| − | d. Select the baud rate of the serial port to be | + | d. Select the baud rate of the serial port to be 1500000<br> |
| − | e. Finally click the | + | e. Finally click the "OK" button to complete the setting |
</div> | </div> | ||
| − | <div | + | <div >[[File:Orange-pi-r1-plus-lts-img22.png|800px]]</div> |
| − | 5)After clicking the | + | 5)After clicking the "OK" button, you will enter the following interface, and you can see the output information of the serial port when you start the development board. |
| − | <div | + | <div >[[File:Orange-pi-r1-plus-lts-img20.png|800px]]</div> |
| − | For more information on using the Orange Pi | + | <br> |
| + | |||
| + | == '''Download the Orange Pi R1 Plus LTS User Manual''' == | ||
| + | For more information on using the Orange Pi R1 Plus LTS, please see the [https://drive.google.com/drive/folders/1e0lEviLJWQUUBUVYXENYRJkme6WmUiiZ?usp=sharing <span style="color:#ff003a;">Orange Pi R1 Plus LTS User Manual</span>]. (Click to download) | ||
Latest revision as of 18:41, 30 June 2022
Contents
- 1 Basic features of Orange Pi R1 Plus LTS
- 2 Introduction to use the development board
- 2.1 Prepare the necessary accessories
- 2.2 Download the image and related information of the development board
- 2.3 Method to burn Linux image or OpenWRT image to TF card based on Windows PC
- 2.4 Method of flashing Linux image or OpenWRT image to TF card based on Ubuntu PC
- 2.5 Method of flashing Android firmware to TF card
- 2.6 Start the Orange Pi development board
- 2.7 How to use the debug serial port
- 3 Download the Orange Pi R1 Plus LTS User Manual
Basic features of Orange Pi R1 Plus LTS
What is Orange Pi R1 Plus LTS?
Orange Pi R1 Plus LTS is an open source single-board computer, a new generation of arm-64 development board, it can run Android 9.0, Ubuntu, Debian and OpenWRT and other operating systems. Orange Pi R1 Plus LTS uses Rockchip rk3328 system-on-chip and has 1GB LPDDR3 memory
Purpose of Orange Pi R1 Plus LTS?
Typical Application:
- A router
- One switch
Of course there are other more functions, because Orange Pi is open source
Who’s it for?
The Orange Pi development board is not only a consumer product, but also designed for anyone who wants to use technology to create and innovate. It is a very simple, interesting and practical tool, you can use it to create the world around you
Hardware features of Orange Pi R1 Plus LTS
| Hardware Specification introduction
| |
| CPU |
Rockchip RK3328 |
| GPU |
Mali-450MP2 |
| Power management chip | RK805 |
| Memory (SDRAM) | 1GB LPDDR3( shared with GPU) |
| Onboard Storage |
|
| Onboard Network |
|
| Video Output | TV CVBS output(Via 13pin interface board) |
| Audio output | 3.5mm audio port(Via 13pin interface board) |
| Power Source | USB Type C interface 5V2A input |
| USB | 1x USB 2.0 HOST |
| Low-level peripherals | 13pin header with IR pin、Tv-out、AUDIO(no MIC) 2xUSB2.0(not support)and 1 GPIO port |
| Debug serial port | UART-TX、UART-RX and GND |
| Button | 1x Reset Button |
| Fan interface | 1x cooling fan interface (5V) |
| LED | Power led & Status led |
| IR receiver | Support IR remote control (via 13pin interface board) |
| Supported OS | Android 9、Ubuntu、Debian、OpenWRT |
Appearance specification introduction
| |
| Dimension | 63mmX60.6mmX27.3mm |
| Weight | 175g |
Top view and Bottom view of Orange Pi R1 Plus LTS
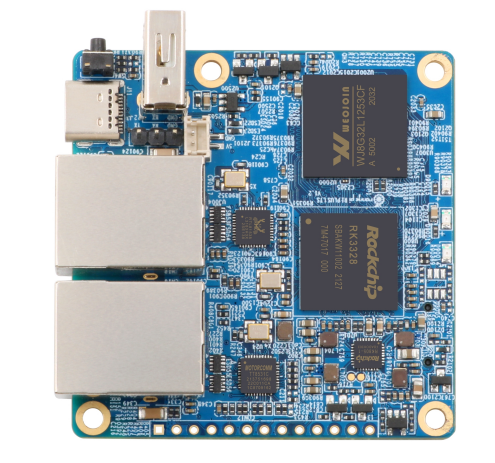
Top View:
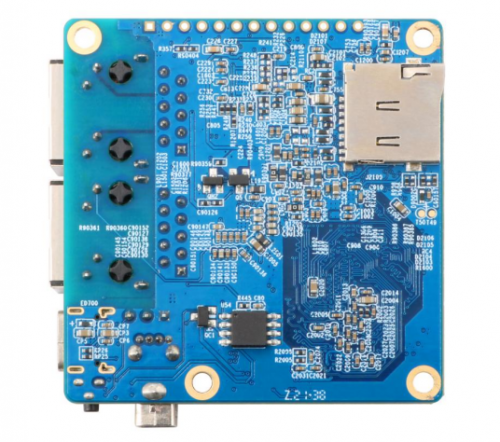
Bottom View:
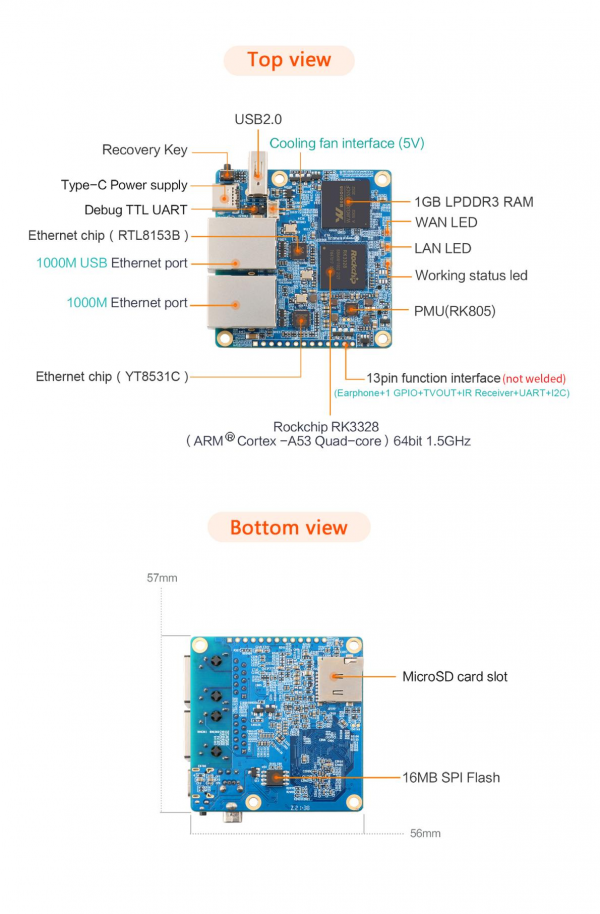
Orange Pi R1 Plus LTS interface details
Introduction to use the development board
Prepare the necessary accessories
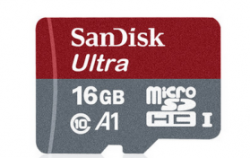
1)TF card, a high-speed card of class 10 or higher with a minimum capacity of 8GB, it is recommended to use SanDisk TF card. Orange Pi tests are all SanDisk TF cards. Other brands of TF cards may cause the system to fail to start.
2)TF card reader, used to read and write TF card
3)Power adapter, 5V/2A or 5V/3A high-quality Type C interface power adapter
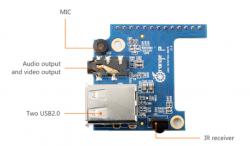
4)13pin interface board
a.The actual interface board is shown below
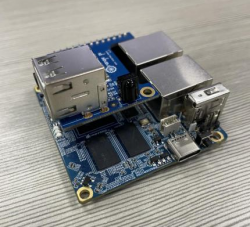
b.The way to insert the interface board into the development board is as follows, remember not to insert it backwards
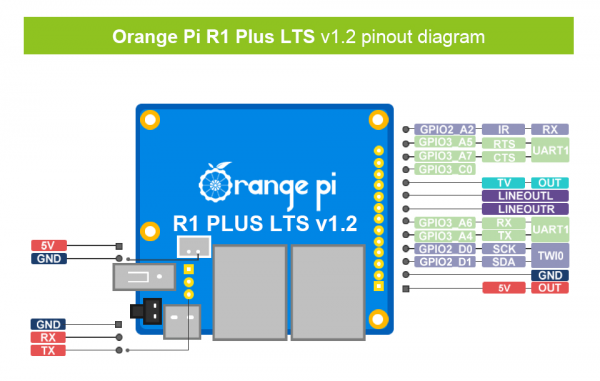
c.The 13pin header on the Orange Pi R1 Plus LTS development board can be connected to the interface board to expand the functions that are not on the development board. The functions included in the interface board are:
| 1 | microphone | not support |
| 2 | Analog audio and video output interface | Connect TV through AV cable to output analog audio and video signals (Android system only) |
| 3 | USB2.0 x 2 | not support |
| 4 | IR receiving function | Android system can be controlled by IR remote control |
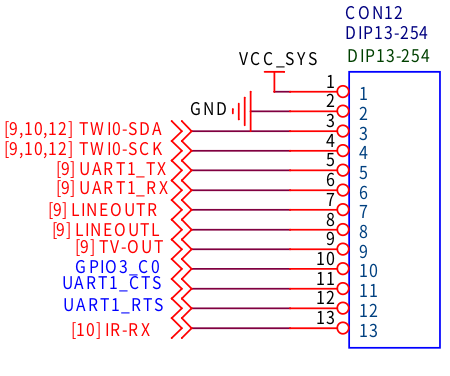
d.The schematic diagram of the 13pin header of Orange Pi R1 Plus LTS is shown below
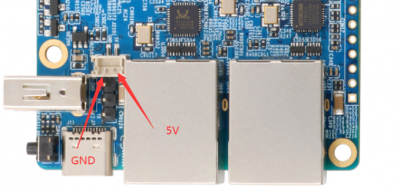
5)CPU fan, used to dissipate heat to the CPU, the interface voltage is 5V, the interface specification is 2pin, 1.5mm spacing
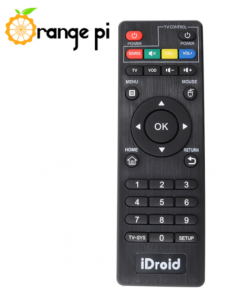
6)IR remote control, mainly used to control Android system
7)100M or 1000M network cable, used to connect the development board to the Internet
8)AV video cable, used to connect the development board to the TV through the CVBS interface to display video (only available for Android System)
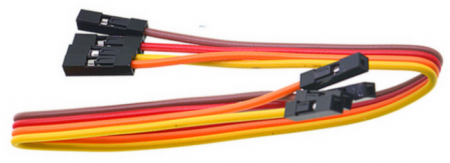
9)USB to TTL module and DuPont cable, when using the serial port debugging function, you need USB to TTL module and DuPont cable to connect the development board and the computer
10)A personal computer with Ubuntu and Windows operating systems
| 1 | Ubuntu18.04 PC | Optional, used to compile Linux, Android and OpenWRT source code |
| 2 | Windows PC | Used to burn Android, Linux and OpenWRT images |
1)The download URL of the Chinese version is:
http://www.orangepi.cn/html/hardWare/computerAndMicrocontrollers/service-and-support/Orange-Pi-R1-Plus-LTS-Router.html
2)The download URL of the English version is:
http://www.orangepi.org/html/hardWare/computerAndMicrocontrollers/service-and-support/Orange-Pi-R1-Plus-LTS-With-Metal-Case.html
3)The information mainly contains
a.Android source code: saved on Baidu Cloud Disk and Google Cloud Disk
b.Linux source code: saved on github, the link address is
https://github.com/orangepi-xunlong/orangepi-build
c.OpenWRT source code: saved on github, the link address is
https://github.com/orangepi-xunlong/openwrt
d. User manual and schematic diagram: chip related data manual will also be placed here
e. Official tools: mainly include the software needed in the use of the development board
f. Android image: saved on Baidu Cloud Disk and Google Cloud Disk
g. Ubuntu image: saved on Baidu Cloud Disk and Google Cloud Disk
h. Debian image: saved on Baidu Cloud Disk and Google Cloud Disk
i. OpenWRT image: saved on Baidu Cloud Disk and Google Cloud Disk
Method to burn Linux image or OpenWRT image to TF card based on Windows PC
1)The method of burning OpenWRT image based on Windows PC is the same as the method of burning Linux image. The following is an example of burning Linux image
2)First, prepare a TF card with 8GB or larger capacity. The transmission speed of the TF card must be above class10. It is recommended to use a TF card of SanDisk and other brands
3)Then use the card reader to insert the TF card into the windows computer
4)Then format the TF card
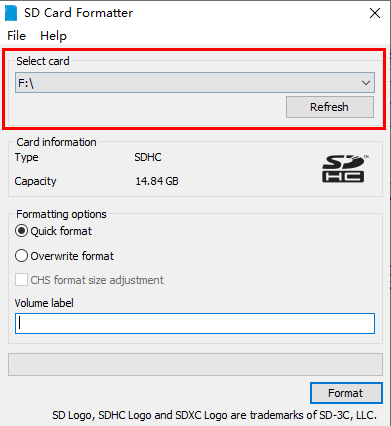
a.You can use the SD Card Formatter software to format the TF card, the download address is
https://www.sdcard.org/downloads/formatter/eula_windows/SDCardFormatterv5_WinEN.zip
b.After downloading, unzip and install directly, and then open the software
c.If the computer only has a TF card inserted, the TF card's drive letter will be displayed in the Select card column. If the computer has multiple USB storage devices inserted, you can select the drive letter corresponding to the TF card through the drop-down box
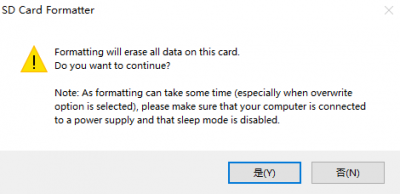
d.Then click Format, a warning box will pop up before formatting, and formatting will start after selecting "Yes (Y)"
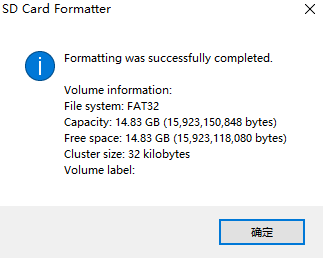
e.After formatting the TF card, the message shown in the figure below will pop up, click OK
5)Download the Linux operating system image file compression package you want to burn from the Orange Pi data download page, and then use the decompression software to decompress it. In the decompressed file, the file ending with ".img" is the operating system image file,the size is generally above 1GB.
6)Use Win32Diskimager to burn Linux image to TF card
a.The download page of Win32Diskimager is
http://sourceforge.net/projects/win32diskimager/files/Archive/
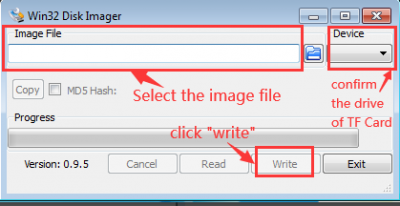
b.Install directly after downloading, the interface of Win32Diskimager is shown below
a)First select the path of the image file
b)Then confirm that the drive letter of the TF card is the same as that displayed in the "Device" column
c)Finally click "Write" to start burning
c.After the image writing is completed, click the "Exit" button to exit, and then you can pull out the TF card and insert it into the development board to start
Method of flashing Linux image or OpenWRT image to TF card based on Ubuntu PC
1)The method of flashing OpenWRT image based on Ubuntu PC is the same as that of flashing Linux image. The following is an example of flashing Linux image
2)First, prepare a TF card with 8GB or larger capacity. The transmission speed of the TF card must be above class10. It is recommended to use a TF card of SanDisk and other brands
3)Then use a card reader to insert the TF card into the computer
4)Download balenaEtcher software, the download address is
https://www.balena.io/etcher/
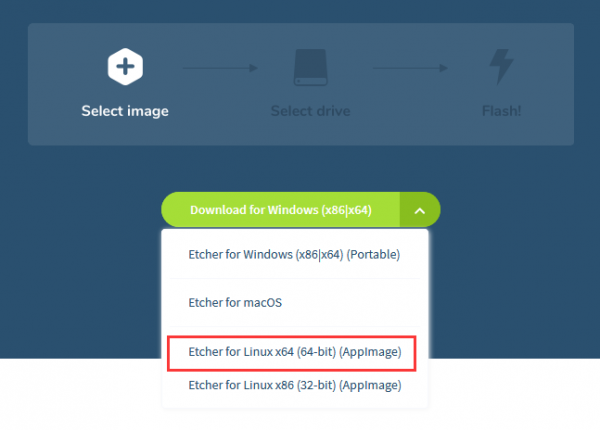
5)After entering the balenaEtcher download page, please select the Linux version of the software through the drop-down box to download
6)After downloading, use unzip to decompress. The decompressed balenaEtcher-1.5.109-x64.AppImage is the software needed to burn Linux image
test@test:~$ unzip balena-etcher-electron-1.5.109-linux-x64.zip
Archive: balena-etcher-electron-1.5.109-linux-x64.zip
inflating: balenaEtcher-1.5.109-x64.AppImage
test@test:~$ ls
balenaEtcher-1.5.109-x64.AppImage balena-etcher-electron-1.5.109-linux-x64.zip
7)Download the Linux operating system image file compression package you want to burn from Orange Pi's data download page, and then use the decompression software to decompress it. In the decompressed file, the file ending with ".img" is the operating system image file. The size is generally above 1GB
a.The decompression command of the compressed package at the end of 7z is as follows
test@test:~$ 7z x Orangepir1plus-lts_2.1.4_ubuntu_bionic_server_linux
5.10.44.7z
test@test:~$ ls Orangepir1plus-lts_2.1.4_ubuntu_bionic_server_linux
5.10.44.*
Orangepir1plus-lts_2.1.4_ubuntu_bionic_server_linux
5.10.44.7z
Orangepir1plus-lts_2.1.4_ubuntu_bionic_server_linux
5.10.44.img.sha #Checksum file
Orangepir1plus-lts_2.1.4_ubuntu_bionic_server_linux
5.10.44.img # image file
8)After decompressing the image, you can first use the sha256sum -c *.sha command to calculate whether the checksum is correct. If it is prompted that the downloaded image is correct, you can safely burn it to the TF card. If the checksum does not match, it indicates There is a problem with the downloaded image, please try to download again
test@test:~$ sha256sum -c *.sha
Orangepir1plus-lts_2.1.4_ubuntu_bionic_server_linux
5.10.44.img: Success
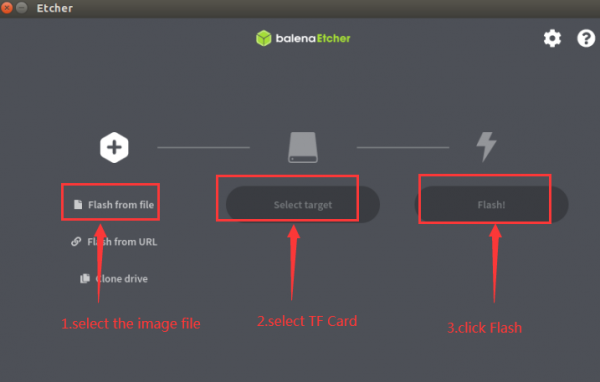
9)Then double-click balenaEtcher-1.5.109-x64.AppImage on the graphical interface of Ubuntu PC to open balenaEtcher (no installation required), the opened interface is shown in the figure below
a. First select the path of the linux image file
b. Then select the device number of the TF card
c. Finally click Flash to start burning
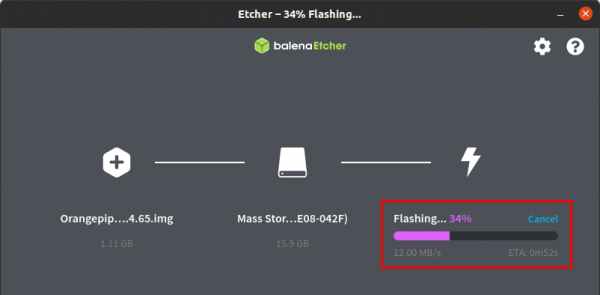
10)The writing speed and remaining time will be prompted during the burning process
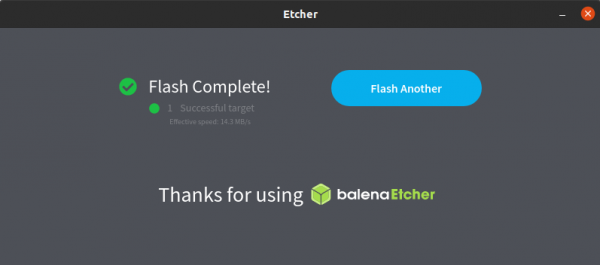
11)After burning, the following interface will be displayed. At this time, you can unplug the TF card from the computer and insert it into the development board to start.
Method of flashing Android firmware to TF card
Android image can only be burned to TF card using SDDiskTool software under Windows platform, and cannot be burned under Linux platform
1)First prepare a TF card with 8GB or larger capacity. The transmission speed of the TF card must be above class10. It is recommended to use a TF card of SanDisk and other brands
2)Then use a card reader to insert the TF card into the computer
3)Download Android 9.0 firmware and SDDiskTool burning tool from Orange Pi's data download page
4) Use the decompression software to decompress the downloaded Android firmware compressed package. In the decompressed file, the file ending with ".img" is the Android firmware
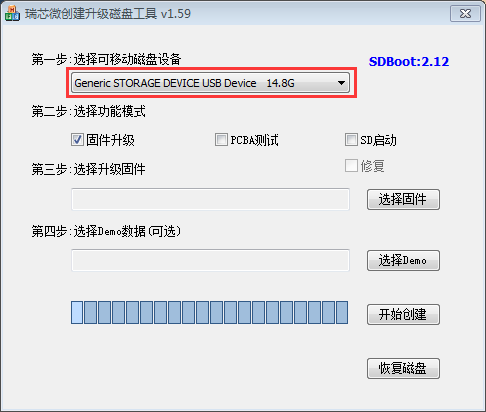
5) Use decompression software to decompress SDDiskTool_v1.59, this software does not need to be installed, find SD_Firmware_Tool in the decompressed folder and open it
6)After opening SD_Firmware_Tool, if the TF card is recognized normally, the name and capacity of the TF card will be displayed when the removable disk device is selected. Please make sure that the displayed TF card device information is consistent with the device information of the TF card you want to burn. There is no display, you can try to unplug the TF card
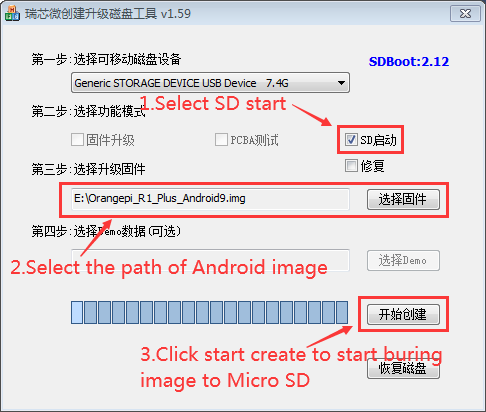
7)After confirming the device information, start writing the Android firmware to the TF card
a. First check "SD start" in the "Select function mode" column
b. Select the path of Android image in "Select Firmware Upgrade"
c. Then click the "Start Create" button
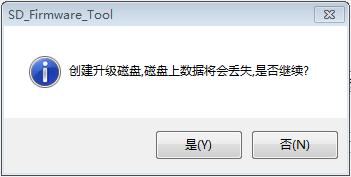
d.After clicking "Start to create", a warning box will pop up, select "Yes (Y)" to start burning
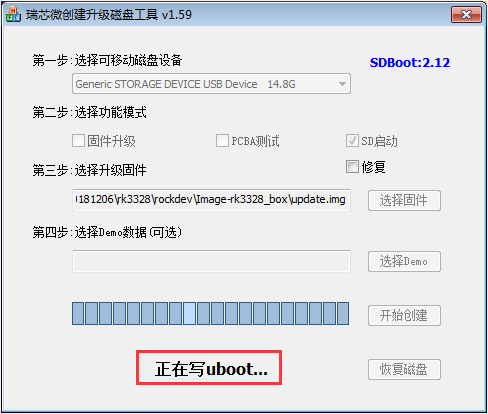
e.After starting to burn, the partition currently being burned will be displayed below
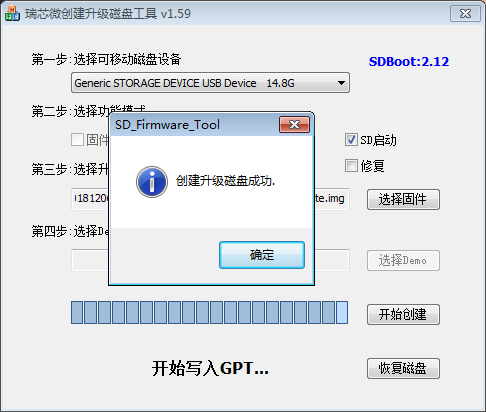
8)After burning, the display of SD_Firmware_Tool is as shown in the figure below. At this time, click the OK button to close SD_Firmware_Tool, and then you can unplug the TF card from the computer and insert it into the development board to start
Start the Orange Pi development board
1)Insert the burned TF card into the TF card slot of the Orange Pi development board
2) The development board has an Ethernet port, which can be plugged into a network cable for Internet access
3)Connect a 5V/2A (5V/3A is also available) high-quality power adapter
a.Remember not to plug in the 12V power adapter, if you plug in the 12V power adapter, it will burn the development board
b.Many unstable phenomena during system power-on and startup are basically caused by power supply problems, so a reliable power adapter is very important
4)If you want to view the output information of the system through the debug serial port, please use the USB to TTL module and DuPont cable to connect the development board to the computer. For the connection method of the serial port, please refer to the section on the use of the debug serial port
5)Then turn on the switch of the power adapter, if everything is normal, the serial terminal can see the output log of the system startup at this time
How to use the debug serial port
Debug serial port connection instructions
1)First, you need to prepare a USB to TTL module. This module can be bought in Orange Pi Store. If there are other similar USB to TTL modules, you can also insert the USB port of the USB to TTL module into the USB of the computer Interface
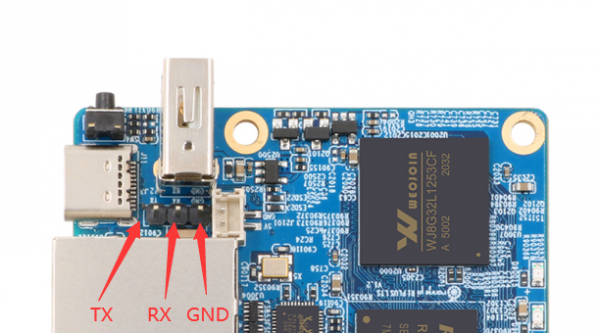
2)The corresponding relationship between the debug serial port GND, TX and RX pins of the development board is shown in the figure below
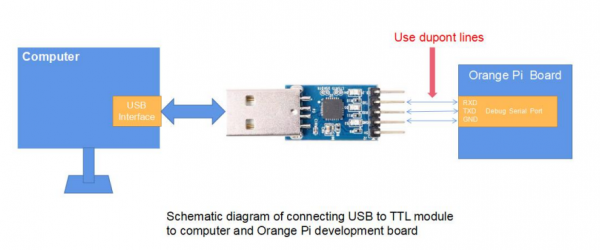
3)The GND, TX and RX pins of the USB to TTL module need to be connected to the debug serial port of the development board through a Dupont cable
a. Connect the GND of the USB to TTL module to the GND of the development board
b. Connect the RX of the USB to TTL module to the TX of the development board
c. Connect the TX of the USB to TTL module to the RX of the development board
4)The schematic diagram of connecting the USB to TTL module to the computer and the Orange Pi development board is shown below
5)If you are using a CP2102 USB to TTL module, under the condition of a baud rate of 1.500000, some systems may encounter garbled or unusable problems. The specific test situation is as follows
| USB to TTL module model | Host system | Support situation |
| CH340 | win7 | ok |
| win10 | ok | |
| ubuntu14.04 | ok | |
| ubuntu18.04 | ok | |
| ubuntu20.04 | ok | |
| CP2102 | win7 | ok |
| win10 | Not available | |
| ubuntu14.04 | ok | |
| ubuntu18.04 | Not available | |
| ubuntu20.04 | Not available |
How to use the debugging serial port on Ubuntu platform
1)If the USB to TTL module is connected normally, you can see the corresponding device node name under /dev of the Ubuntu PC, remember this node name, it will be used when setting the serial port software later
test@test:~$ ls /dev/ttyUSB*
/dev/ttyUSB0
2)There are many serial debugging tools that can be used under linux, such as putty, minicom, etc. The following demonstrates how to use putty
3)First install putty on the Ubuntu PC
test@test:~$ sudo apt update
test@test:~$ sudo apt -y install putty
4)Then run putty, remember to add sudo permissions
test@test:~$ sudo putty
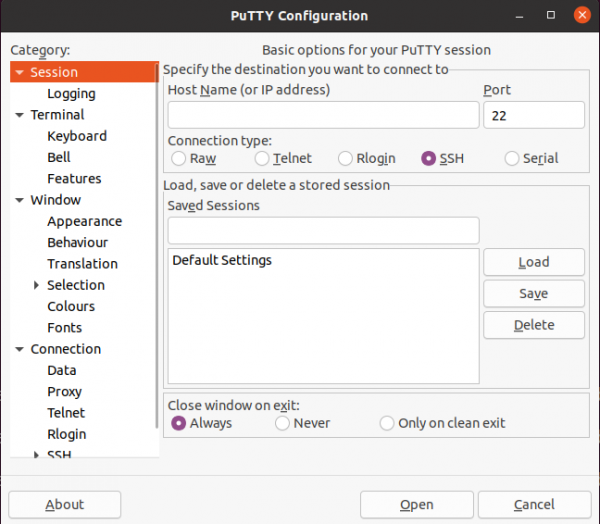
5)After executing the putty command, the following interface will pop up
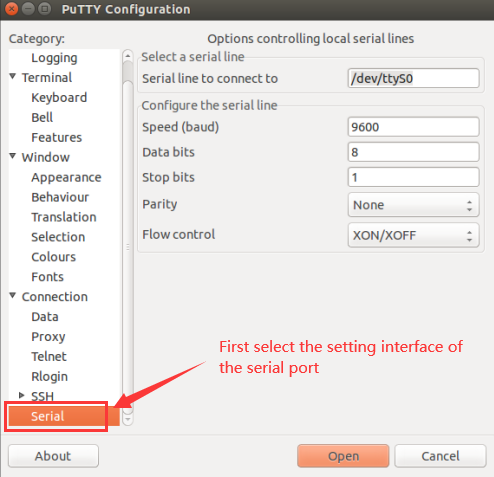
6)First select the setting interface of the serial port
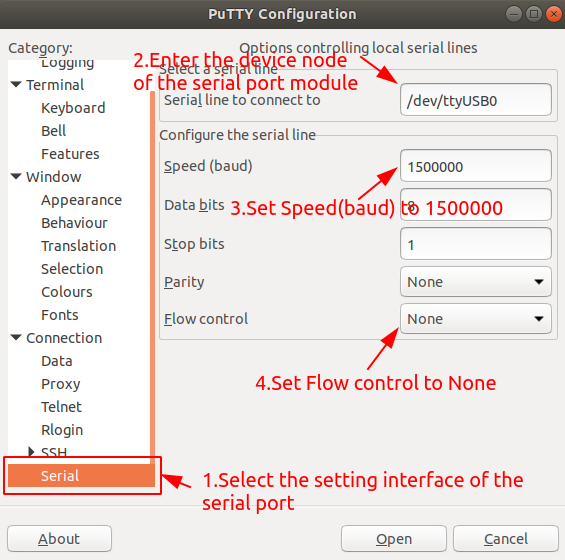
7)Then set the parameters of the serial port
a. Set the Serial line to connect to to /dev/ttyUSB0 (modify to the corresponding node name, generally /dev/ttyUSB0)
b. Set Speed (baud) to 1500000 (baud rate of the serial port)
c. Set Flow control to None
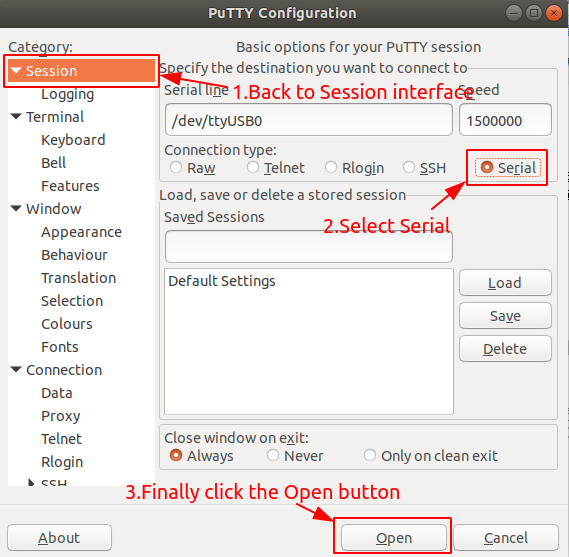
8)After setting the serial port setting interface, return to the Session interface
a. First select the Connection type as Serial
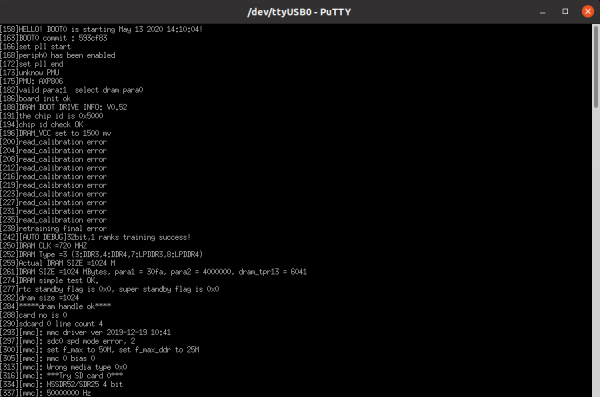
9)After starting the development board, you can see the Log information output by the system from the opened serial port terminal
How to use the debugging serial port on Windows platform
1)There are many serial debugging tools that can be used under Windows, such as SecureCRT, MobaXterm, etc. The following shows how to use MobaXterm. This software is free and can be used without purchasing a serial number.
2)Download MobaXterm
a.Download the MobaXterm URL as follows
https://mobaxterm.mobatek.net/
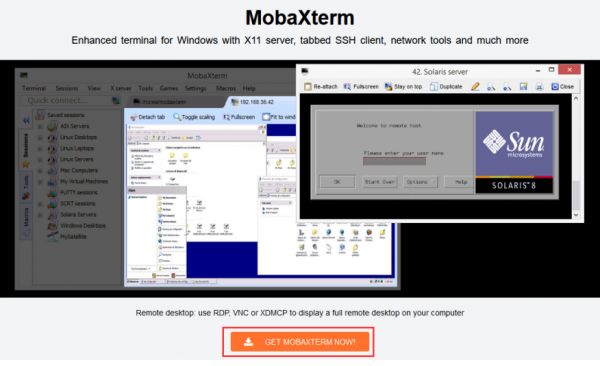
b.After entering the MobaXterm download page, click GET XOBATERM NOW!
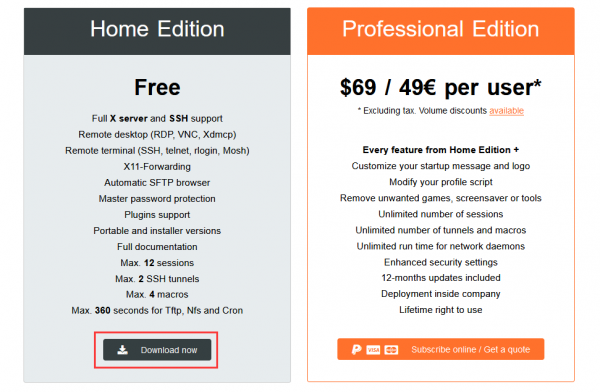
c.Then choose to download the Home version
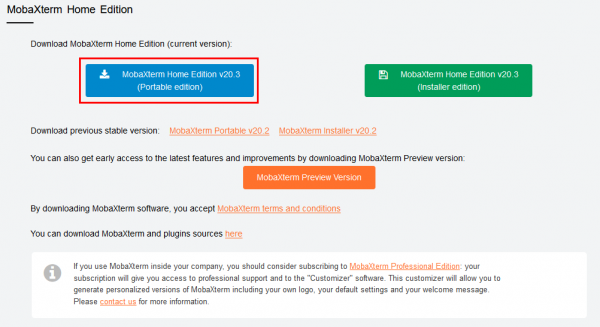
d.Then select the Portable version, after downloading, you don’t need to install it, just open it and you can use it
3)After downloading, use the decompression software to decompress the downloaded compressed package, you can get the executable software of MobaXterm, and then double-click to open it
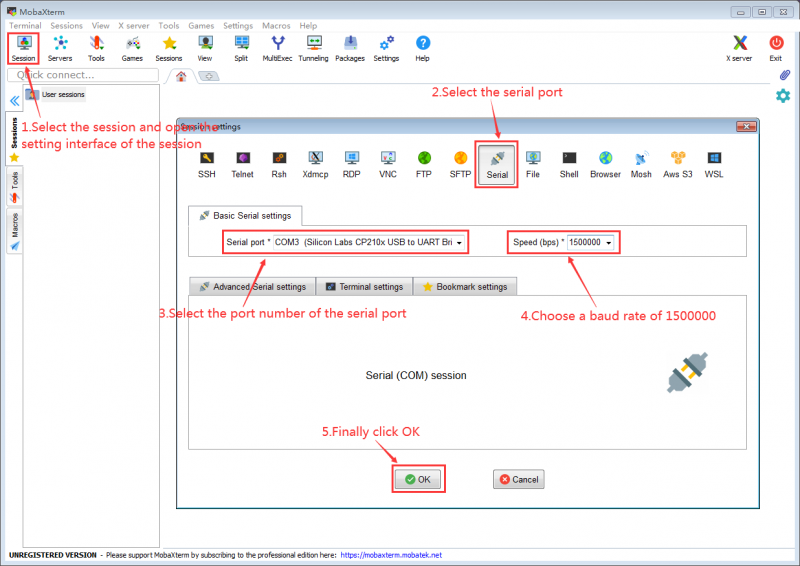
4)After opening the software, the steps to set up the serial port connection are as follows
a. Open setting interface of the session
b. Select the serial port type
c. Select the port number of the serial port (choose the corresponding port number according to the actual situation), if you can't see the port number, please use the "360 driver master" to scan and install the USB to TTL serial chip driver
d. Select the baud rate of the serial port to be 1500000
e. Finally click the "OK" button to complete the setting
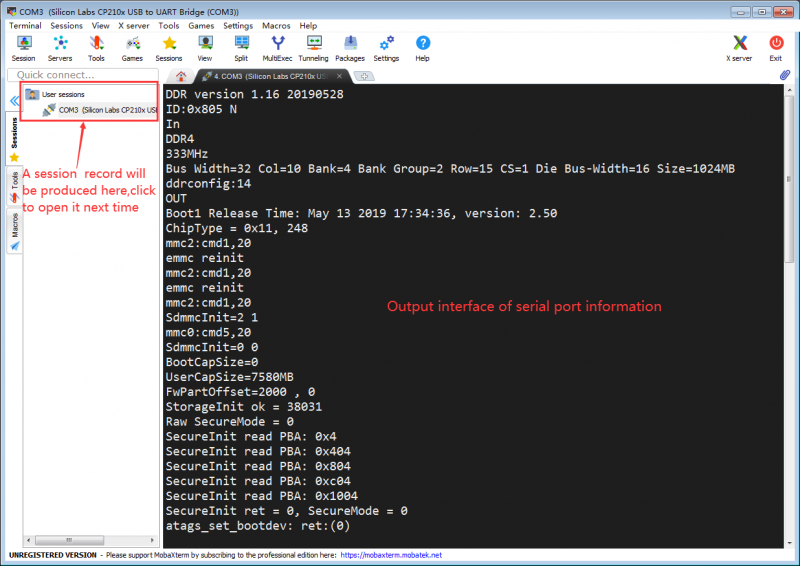
5)After clicking the "OK" button, you will enter the following interface, and you can see the output information of the serial port when you start the development board.
Download the Orange Pi R1 Plus LTS User Manual
For more information on using the Orange Pi R1 Plus LTS, please see the Orange Pi R1 Plus LTS User Manual. (Click to download)
