Orange Pi 5
Contents
- 1 Getting Started
- 2 What is Orange Pi 5
- 3 Purpose of Orange Pi 5
- 4 Close look of Orange Pi 5
- 5 Starting Orange Pi 5 for the first time
- 6 Parameter table
Getting Started
This guide is designed for Orange Pi 5. The purpose is to learn about Orange Pi 5 as well as how to prepare and set up for basic use.
What is Orange Pi 5
Orange Pi 5 adopts Rockchip RK3588S new-generation octa-core 64-bit ARM processor, specifically quad-core A76 and quad-core A55, using Samsung 8nm LP process technology, large-core main frequency up to 2.4GHz, integrated ARM Mali
-G610 MP4 GPU, embedded with high-performance 3D and 2D image acceleration modules, built-in AI accelerator NPU with a computing power of up to 6 Tops, has 4GB/8GB/16GB/32GB (LPDDR4/4x) memory, and has up to 8K display processing capabilities.
Orange Pi 5 brings out quite a lot of interfaces, including HDMI output, Type-C, M.2 PCIe2.0x1, Gigabit Ethernet port, USB2.0, USB3.0 interface and 26pin expansion pin header, etc. It can be widely used in high-end tablet, edge computing, artificial intelligence, cloud computing, AR/VR, smart security, smart home and other fields, covering various AIoT industries.
Orange Pi 5 supports Orange Pi OS, the official operating system developed by Orange Pi. At the same time, it supports Android 12.1, Debian11, Ubuntu20.04 and Ubuntu22.04 and other operating systems.
Purpose of Orange Pi 5
We can use it to achieve:
- A Linux desktop computer
- A Linux web server
- Android tablet
- Android game console, etc.
Of course, there are more functions, because the Orange Pi 5 development board can install Linux systems such as Debian and Ubuntu, and systems such as Android, which means that we can implement it within the scope of the development board hardware and software support. Various functions.
Close look of Orange Pi 5
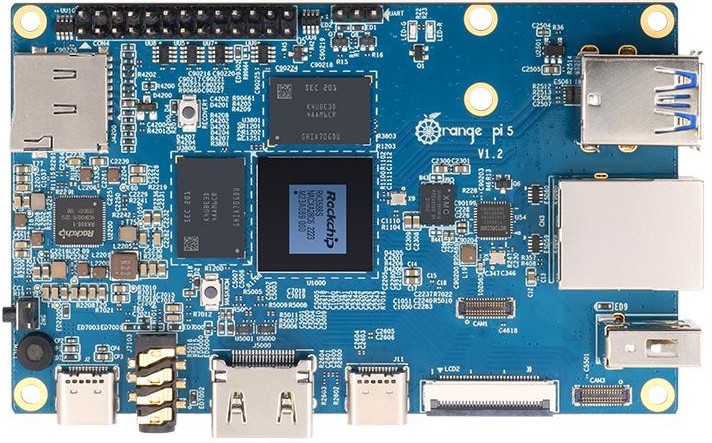
Top view:
Bottom view:
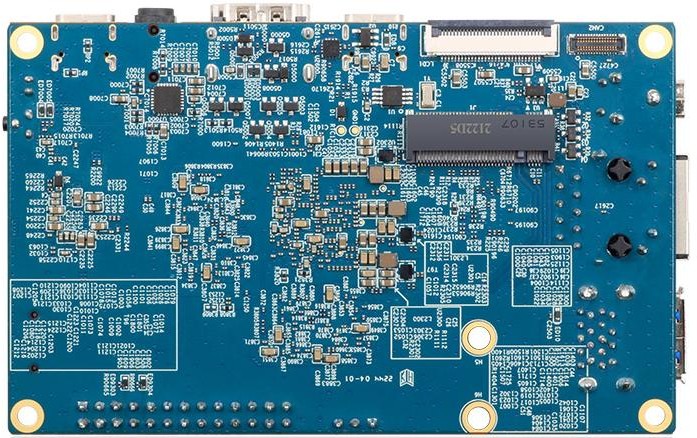
For detailed hardware descriptions and pinouts, please refer to the Orange Pi 5 detail page。
Starting Orange Pi 5 for the first time
Orange Pi 5 can be started in two ways, one is to burn the image to the SSD and the other is to burn the image to the TF card.
What you need
- Orange Pi 5 main board
- TF card, a class 10 or above high-speed SanDisk card with a minimum capacity of 8GB (32GB or above is recommended)
- TF card reader, used to burn the image into the TF card
- Display with HDMI interface
- HDMI to HDMI cable, used to connect the development board to an HDMI monitor or TV for display
- Type-C to HDMI cable, connect the development board to an HDMI monitor or TV for display through the Type-C interface
- Type-C to USB adapter, used to connect USB storage devices or USB devices such as mouse and keyboard
- 10.1-inch MIPI screen, used to display the system interface of the development board
- Power adapter, Orange Pi 5 is recommended to use 5V/4A Type-C power supply for power supply
- The mouse and keyboard of the USB interface, as long as the mouse and keyboard of the standard USB interface are acceptable, the mouse and keyboard can be used to control the Orange Pi development board
- USB camera
- 5V cooling fan
- 100M or 1000M network cable, used to connect the development board to the Internet
- The data cable of the Type-C interface, used to burn the image to NVMe SSD, use ADB and other functions
- OV13850 camera with 13 million MIPI interface
- Matching shell
- 3.3V USB to TTL module and DuPont line, when using the serial port debugging function, need USB to TTL module and DuPont line to connect the development board and computer
- Personal computer with Ubuntu and Windows operating systems installed
1) Ubuntu22.04 PC, Optional, used to compile Linux source code 2) Windows PC, For burning Android and Linux images
下载开发板的镜像和相关的资料
从Orange Pi 5详情页Downloads下载开发板的镜像和相关资料
1) 中文版资料的下载网址为
http://www.orangepi.cn/html/hardWare/computerAndMicrocontrollers/service-and-support/Orange-pi-5.html
2) 英文版资料的下载网址为
http://www.orangepi.org/html/hardWare/computerAndMicrocontrollers/service-and-support/Orange-pi-5.html
3) 资料主要包含
a. Android 源码:保存在百度云盘和谷歌网盘上
b. Linux 源码:保存在 Github 上
c. 用户手册和原理图:保存在百度云盘和谷歌网盘上
d. 官方工具:主要包括开发板使用过程中需要用到的软件
e. Android 镜像:保存在百度云盘和谷歌网盘上
f. Ubuntu 镜像:保存在百度云盘和谷歌网盘上
g. Debian 镜像:保存在百度云盘和谷歌网盘上
基于 Windows PC 将 Linux 镜像烧写到 TF 卡的方法
| 注意,这里说的Linux镜像具体指的是从Orange Pi资料下载页面下载的Debian或者Ubuntu这样的Linux发行版镜像。 |
使用 balenaEtcher 烧录 Linux 镜像的方法
1) 首先准备一张 16GB 或更大容量的TF卡,TF卡的传输速度必须为 class10 级或class10 级以上,建议使用闪迪等品牌的TF卡。
2) 然后使用读卡器把 TF 卡插入电脑。
3) 从 Orange Pi 的资料下载页面下载想要烧录的 Linux 操作系统镜像文件压缩包, 然后使用解压软件解压,解压后的文件中,以“.img”结尾的文件就是操作系统的镜像文件,大小一般都在 2GB 以上。
4) 然后下载 Linux 镜像的烧录软件——balenaEtcher,下载地址为:
https://www.balena.io/etcher/
5) 进入 balenaEtcher 下载页面后,点击绿色的下载按钮就可以下载 balenaEtcher 的安装包,也可以通过下拉框选择 balenaEtcher 的 Portable 版本的软件,Portable 版本无需安装,双击打开就可以使用。
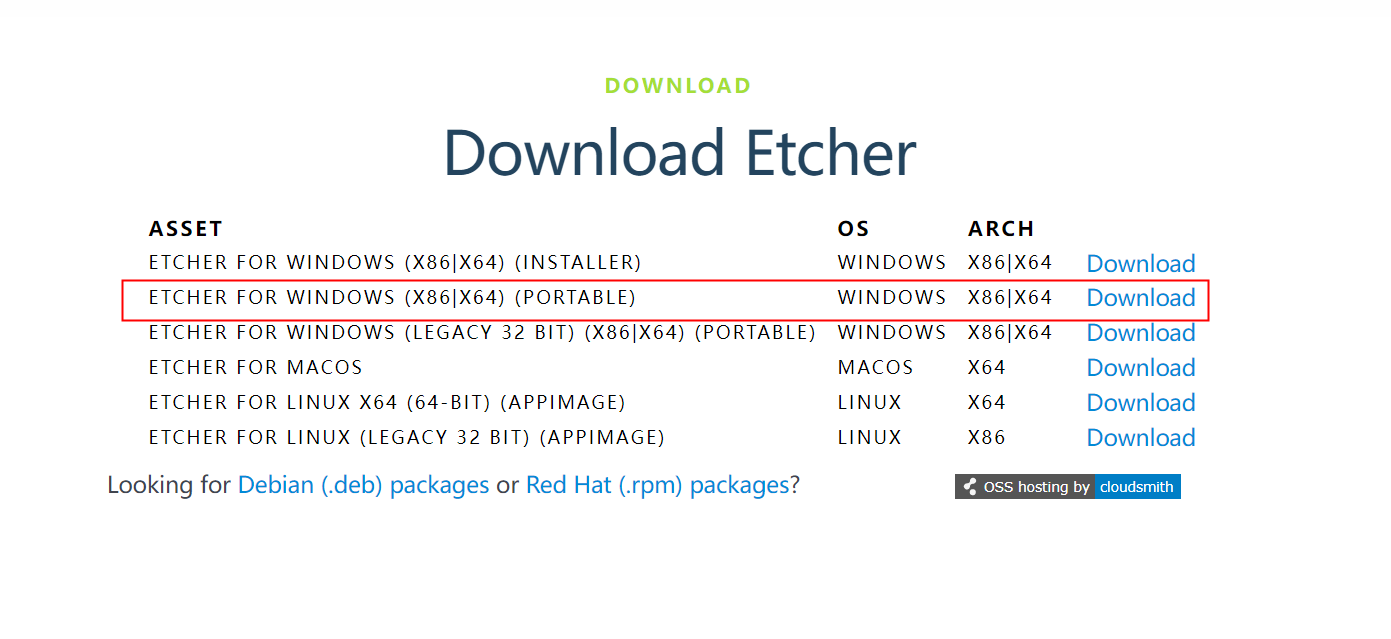
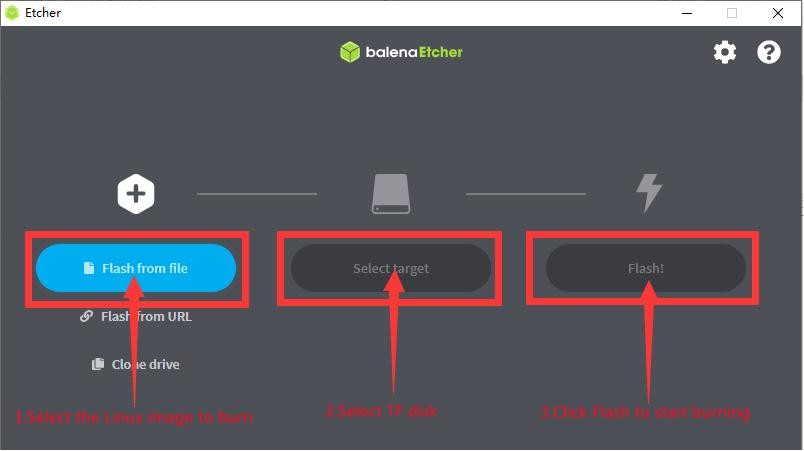
6) 如果下载的是需要安装版本的 balenaEtcher,请先安装再使用。如果下载的Portable 版本 balenaEtcher,直接双击打开即可,打开后的 balenaEtcher 界面如下图所示:
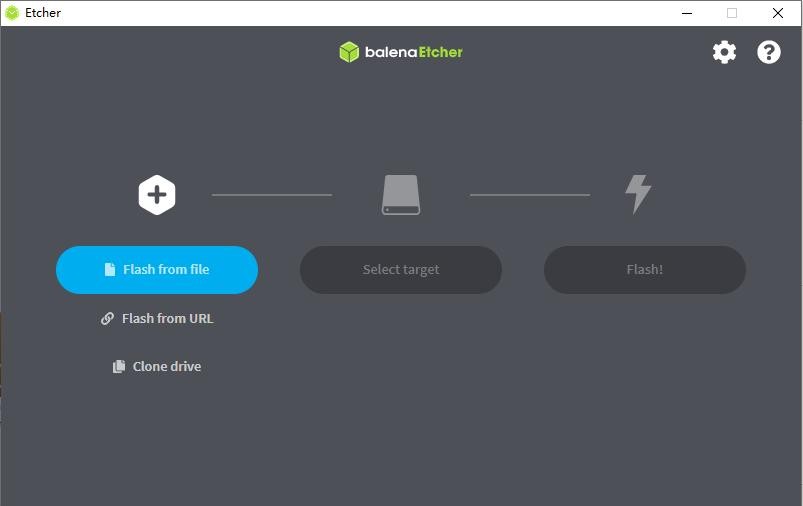

7) 使用 balenaEtcher 烧录 Linux 镜像的具体步骤如下所示:
a. 首先选择要烧录的 Linux 镜像文件的路径
b. 然后选择 TF 卡的盘符
c. 最后点击 Flash 就会开始烧录 Linux 镜像到 TF 卡中
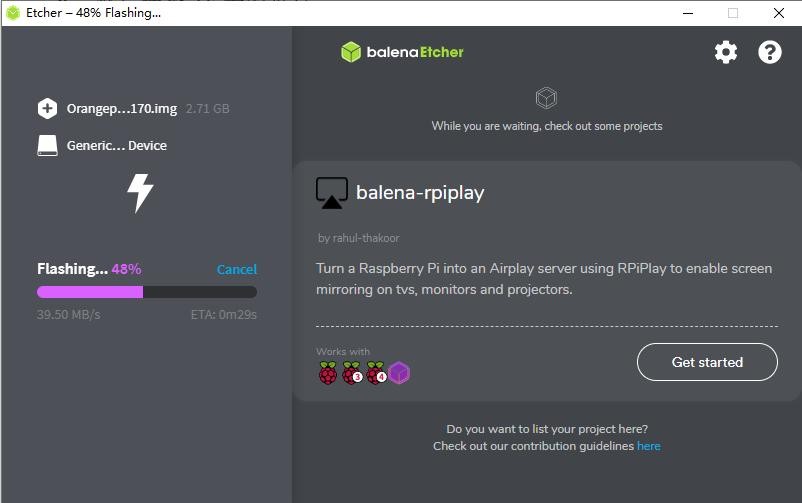
8) balenaEtcher 烧录 Linux 镜像的过程显示的界面如下图所示,另外进度条显示紫色表示正在烧录 Linux 镜像到 TF 卡中。
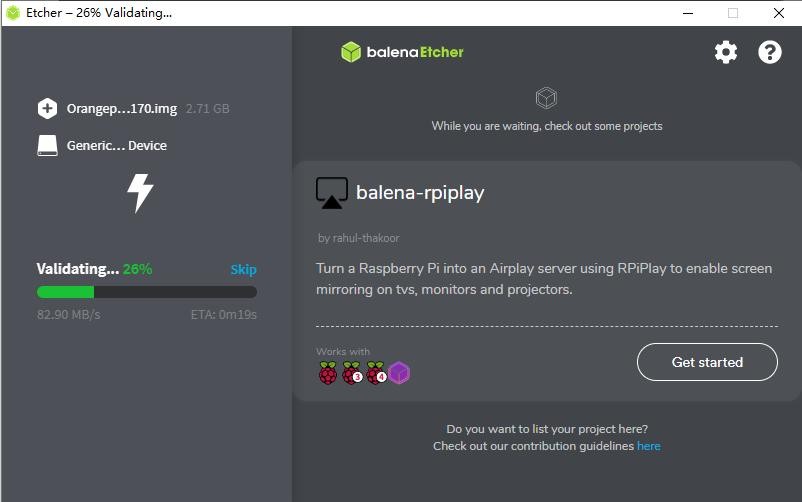
9) Linux 镜像烧录完后,balenaEtcher 默认还会对烧录到 TF 卡中的镜像进行校验, 确保烧录过程没有出问题。如下图所示,显示绿色的进度条就表示镜像已经烧录完成,balenaEtcher 正在对烧录完成的镜像进行校验。
10) 成功烧录完成后 balenaEtcher 的显示界面如下图所示,如果显示绿色的指示图标说明镜像烧录成功,此时就可以退出 balenaEtcher,然后拔出 TF 卡插入到开发板的 TF 卡槽中使用了。
使用 RKDevTool 烧录 Linux 镜像到 TF 卡中的方法
使用 RKDevTool 烧录 Linux 镜像到 TF 卡中的方法。
使用 Win32Diskimager 烧录 Linux 镜像的方法
使用 Win32Diskimager 烧录 Linux 镜像的方法。
你也可以在Orange Pi 5用户手册中查阅:
- 基于Ubuntu PC 将Linux 镜像烧写到TF 卡的方法
- 烧写Linux 镜像到SPIFlash+NVMe SSD 中的方法
- 烧写Linux 镜像到SPIFlash+SATA SSD 中的方法
- 烧写Linux 镜像到SPIFlash+USB 存储设备中的方法
烧录 Android 镜像到 TF 卡中的方法
1) 首先准备一张 8GB 或更大容量的TF 卡,TF 卡的传输速度必须为 class10 或以上,建议使用闪迪等品牌的 TF 卡
2) 然后使用读卡器把 TF 卡插入电脑
3) 然后从Orange Pi 的资料下载页面下载SDDiskTool 烧写工具,请确保SDDiskTool工具的版本为最新的 v1.72
4) 然后从Orange Pi 的资料下载页面下载 Android12 的镜像
a. 打开安卓镜像的下载链接后可以看到下面三种类型的安卓镜像,请选择 TF卡镜像文件夹中的镜像进行下载

b. 进入 TF卡镜像文件夹后可以看到下面两个镜像,它们的区别是:
a) 不带 lcd 的镜像是专门用于 HDMI 显示的,支持 8K 显示,如果不使用 LCD 屏幕,请下载不带 lcd 的镜像
b) 如果要使用 LCD 屏幕,请选择带 lcd 的镜像
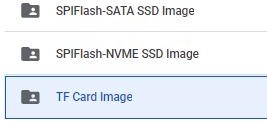
5) 然后使用解压软件解压下载的 Android 镜像的压缩包,解压后的文件中,以“.img” 结尾的文件就是 Android 镜像文件,大小在 1GB 以上
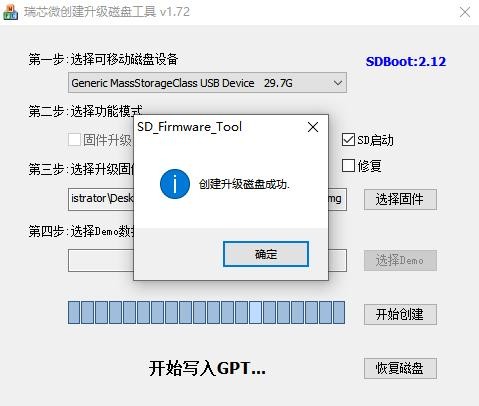
6) 然后使用解压软件解压 SDDiskTool_v1.72.zip,此软件无需安装,在解压后的文件夹中找到 SD_Firmware_Tool.exe 打开即可

7) 打开 SDDiskTool 后,如果 TF 卡识别正常,会在“选择可移动磁盘设备”一栏中显示插入的磁盘设备,请务必确认显示的磁盘设备和你想烧录的TF 卡的盘符是一致的,如果没有显示可以尝试拔插下 TF 卡

8) 确认完盘符后,可以先格式化下 TF 卡,点击 SDDiskTool 中的恢复磁盘按钮即可,也可使用前面提到的 SD Card Formatter 进行 TF 卡的格式化
File:Pi-5-details-pic13.1.png
9) 然后开始将 Android 镜像写入 TF 卡
a. 首先在“选择功能模式”中勾选“SD 启动”
b. 然后在“选择升级固件”一栏中选择 Android 镜像的路径
c. 最后点击“开始创建”按钮就会开始烧录 Android 镜像到 TF 卡中
File:Pi-5-details-pic14.1.png
10) 烧录完后即可退出 SDDiskTool 软件,然后就可以把 TF 卡从电脑中拔出来插到开发板中启动了
File:Pi-5-details-pic15.1.png
你也可以在Orange Pi 5用户手册中查阅:
- 烧录Android 镜像到SPIFlash+NVMe SSD 中的方法
- 烧录Android 镜像到SPIFlash+SATA SSD 中的方法
烧录 Orange Pi OS (Droid)镜像到 TF 卡中的方法
| 注意,下面所有的操作都是在 Windows 电脑中进行的。 |
1) 首先准备一张 8GB 或更大容量的TF 卡,TF 卡的传输速度必须为 class10 或以上,建议使用闪迪等品牌的 TF 卡
2) 然后使用读卡器把 TF 卡插入电脑
3) 然后从Orange Pi 的资料下载页面下载SDDiskTool 烧写工具,请确保SDDiskTool工具的版本为最新的 v1.72
4) 然后从Orange Pi 的资料下载页面下载Orange Pi OS (Droid)的镜像,打开 Orange Pi OS (Droid)镜像的下载链接后可以看到下面三种类型的镜像,请选择下面的镜像
5) 然后使用解压软件解压下载的 Orange Pi OS (Droid)镜像的压缩包,解压后的文件中,以“.img” 结尾的文件就是 Orange Pi OS (Droid)镜像文件,大小在 1GB 以上
6) 然后使用解压软件解压 SDDiskTool_v1.72.zip,此软件无需安装,在解压后的文件夹中找到 SD_Firmware_Tool.exe 打开即可

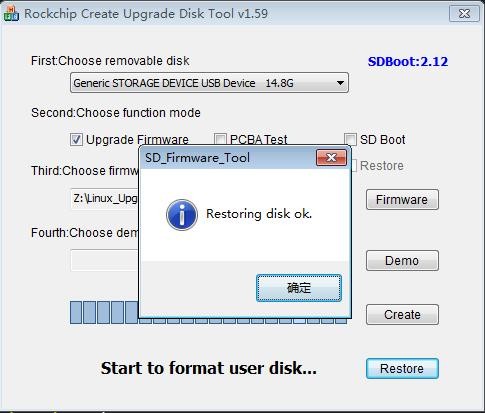
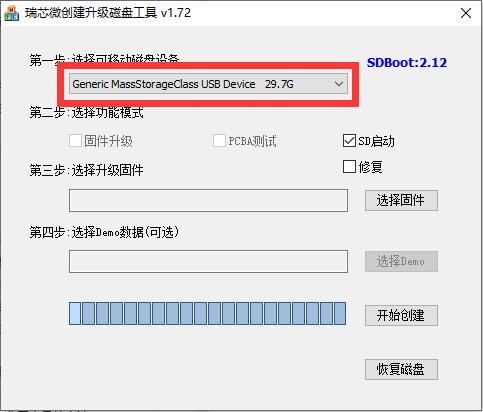
7) 打开 SDDiskTool 后,如果 TF 卡识别正常,会在“选择可移动磁盘设备”一栏中显示插入的磁盘设备,请务必确认显示的磁盘设备和你想烧录的 TF 卡的盘符是一致的,如果没有显示可以尝试拔插下 TF 卡

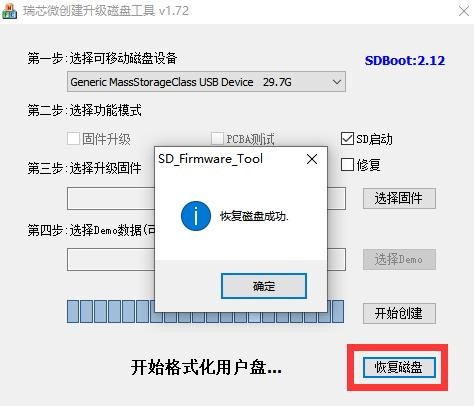
8) 确认完盘符后,可以先格式化下 TF 卡,点击 SDDiskTool 中的恢复磁盘按钮即可,也可使用前面提到的 SD Card Formatter 进行 TF 卡的格式化
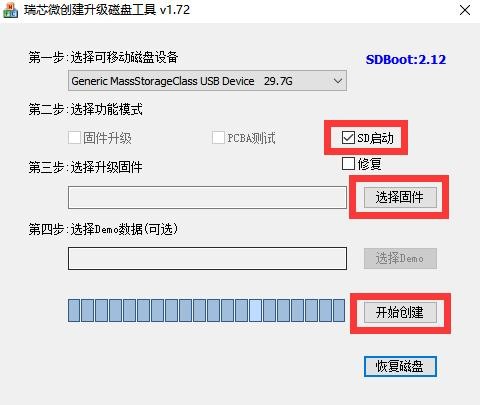
9) 然后开始将 Orange Pi OS (Droid)镜像写入 TF 卡
a. 首先在“选择功能模式”中勾选“SD 启动”
b. 然后在“选择升级固件”一栏中选择 Orange Pi OS (Droid)镜像的路径
c. 最后点击“开始创建”按钮就会开始烧录 Orange Pi OS (Droid)镜像到 TF 卡中
10) 烧录完后即可退出 SDDiskTool 软件,然后就可以把 TF 卡从电脑中拔出来插到开发板中启动了
你也可以在Orange Pi 5用户手册中查阅:
- 烧录Orange Pi OS (Droid)镜像到SPIFlash+NVMe SSD 中的方法
- 烧录Orange Pi OS (Droid)镜像到SPIFlash+SATA SSD 中的方法
启动Orange Pi 5
1) 将烧录好镜像的 TF 卡插入香橙派开发板的 TF卡插槽中。如果 SPIFlash+NVMe SSD 已经烧录好镜像了,那么就不需要插入 TF卡了,只需确保 NVMe SSD 正常插入到开发板中即可。
2) 开发板有HDMI 接口,可以通过HDMI 转HDMI 连接线把开发板连接到电视或者 HDMI 显示器。如果有购买 LCD 屏幕,也可以使用 LCD 屏幕来显示开发板的系统界面。如果有 Type-C 转 HDMI 的线,也可以通过 Type-C 接口来显示开发板的系统界面。
3) 接上 USB 鼠标和键盘,用于控制香橙派开发板。
4) 开发板有以太网口,可以插入网线用来上网。
5) 连接一个 5V/4A 的 USB Type-C 接口的高品质的电源适配。
- 切记不要插入电压输出大于 5V 的电源适配器,会烧坏开发板。
- 系统上电启动过程中很多不稳定的现象基本都是供电有问题导致的,所以一个靠谱的电源适配器很重要。如果启动过程中发现有不断重启的现象,请更换下电源或者 Type-C 数据线再试下。
- Type-C 电源接口是不支持 PD 协商的。
- 另外请不要接到电脑的USB 接口来给开发板供电。
6) 然后打开电源适配器的开关,如果一切正常,此时 HDMI 显示器或者 LCD 屏幕就能看到系统的启动画面了。
7) 如果想通过调试串口查看系统的输出信息,请使用串口线将开发板连接到电脑, 串口的连接方法请参看Orange Pi 5用户手册中“调试串口的使用方法”一节。
Linux系统使用说明
1)已支持的Linux 镜像类型和内核版本
2)板载LED 灯测试说明
3)网络连接测试
查询 以太网口测试
查询 WIFI 连接测试
查询 设置静态 IP 地址的方法
查询 AP6275P PCIe 网卡的使用方法
查询 AP6275P PCIe 网卡通过 create_ap 创建 WIFI 热点的方法
4)HDMI 测试
查询 HDMI 显示测试
查询 HDMI 转 VGA 显示测试
查询 HDMI 分辨率设置方法
5)蓝牙使用方法
6)USB 接口测试
查询 连接 USB 鼠标或键盘测试
查询 连接 USB 存储设备测试
查询 USB 无线网卡测试
查询 USB 摄像头测试
7)音频测试
查询 在桌面系统中测试音频方法
查询 使用命令播放音频的方法
查询 使用命令测试录音的方法
8)26 Pin 接口引脚说明
关于Linux系统使用说明更详细的资料,你可以在Orange Pi 5用户手册中查阅。
Android 12 系统的使用说明
1)已支持的 Android 版本
2)功能适配情况
3)USB 无线网卡的使用方法
4)AP6275P PCIe 网卡的使用方法
5)WIFI 的连接测试方法
6)Wi-Fi hospot 的使用方法
7)蓝牙的测试方法
8)10.1 寸MIPI 屏幕的使用方法
9)OV13850 和OV13855 MIPI 摄像头的测试方法
10)26pin 接口 GPIO、UART、SPI 和 PWM 测试
查询 26pin GPIO 口测试
查询 26pin 的 UART 测试
查询 26pin 的 SPI 测试
查询 26pin 的 PWM 测试
11)ADB的使用方法
查询 使用数据线连接 adb 调试
查询 使用网络连接 adb 调试
12)Android Box 测试过的2.4G USB 遥控器
13)系统HDMI CEC 功能的使用方法
你也可以在Orange Pi 5用户手册中查阅:
- Ubuntu22.04 Gnome Wayland 桌面系统使用说明
- Linux SDK——orangepi-build 使用说明
- Linux 开发手册
- Android 12 源码的编译方法
Parameter table
- Wide range of application scenarios
It can be widely applied to tablets, edge computing, artificial intelligence, cloud computing, AR/VR, intelligent security, smart home and other fields, covering AIoT various industries.
| CPU |
Rockchip RK3399 (28nm HKMG process) |
| SoC | Rockchip RK3588S (8nm LP process) |
| CPU |
|
| GPU |
|
| NPU | Built-in AI accelerator NPU with up to 6 TOPS, supports INT4/INT8/INT16 mixed operation |
| PMU | RK806-1 |
| RAM | 4GB/8GB/16GB /32GB(LPDDR4/4x) |
| Memory |
|
| USB |
|
| Video Output |
|
| Camera |
|
| Audio |
|
| Ethernet | 10/100/1000Mbps Ethernet |
| Expansion Port | For extending UART, PWM, I2C, SPI, CAN and GPIO interfaces. |
| M.2 M-KEY Socket Expansion Slot |
|
| Button |
|
| Power Source | Support Type-C power supply, 5V @ 4A |
| LED |
|
| Debugging | 3 Pin debug serial port (UART) |
| Supported OS | Orangepi OS(Droid)、Orangepi OS(Arch)、Ubuntu、Debian、Android12 |
| Dimensions | 62mm*100mm |
| Weight | 46g |